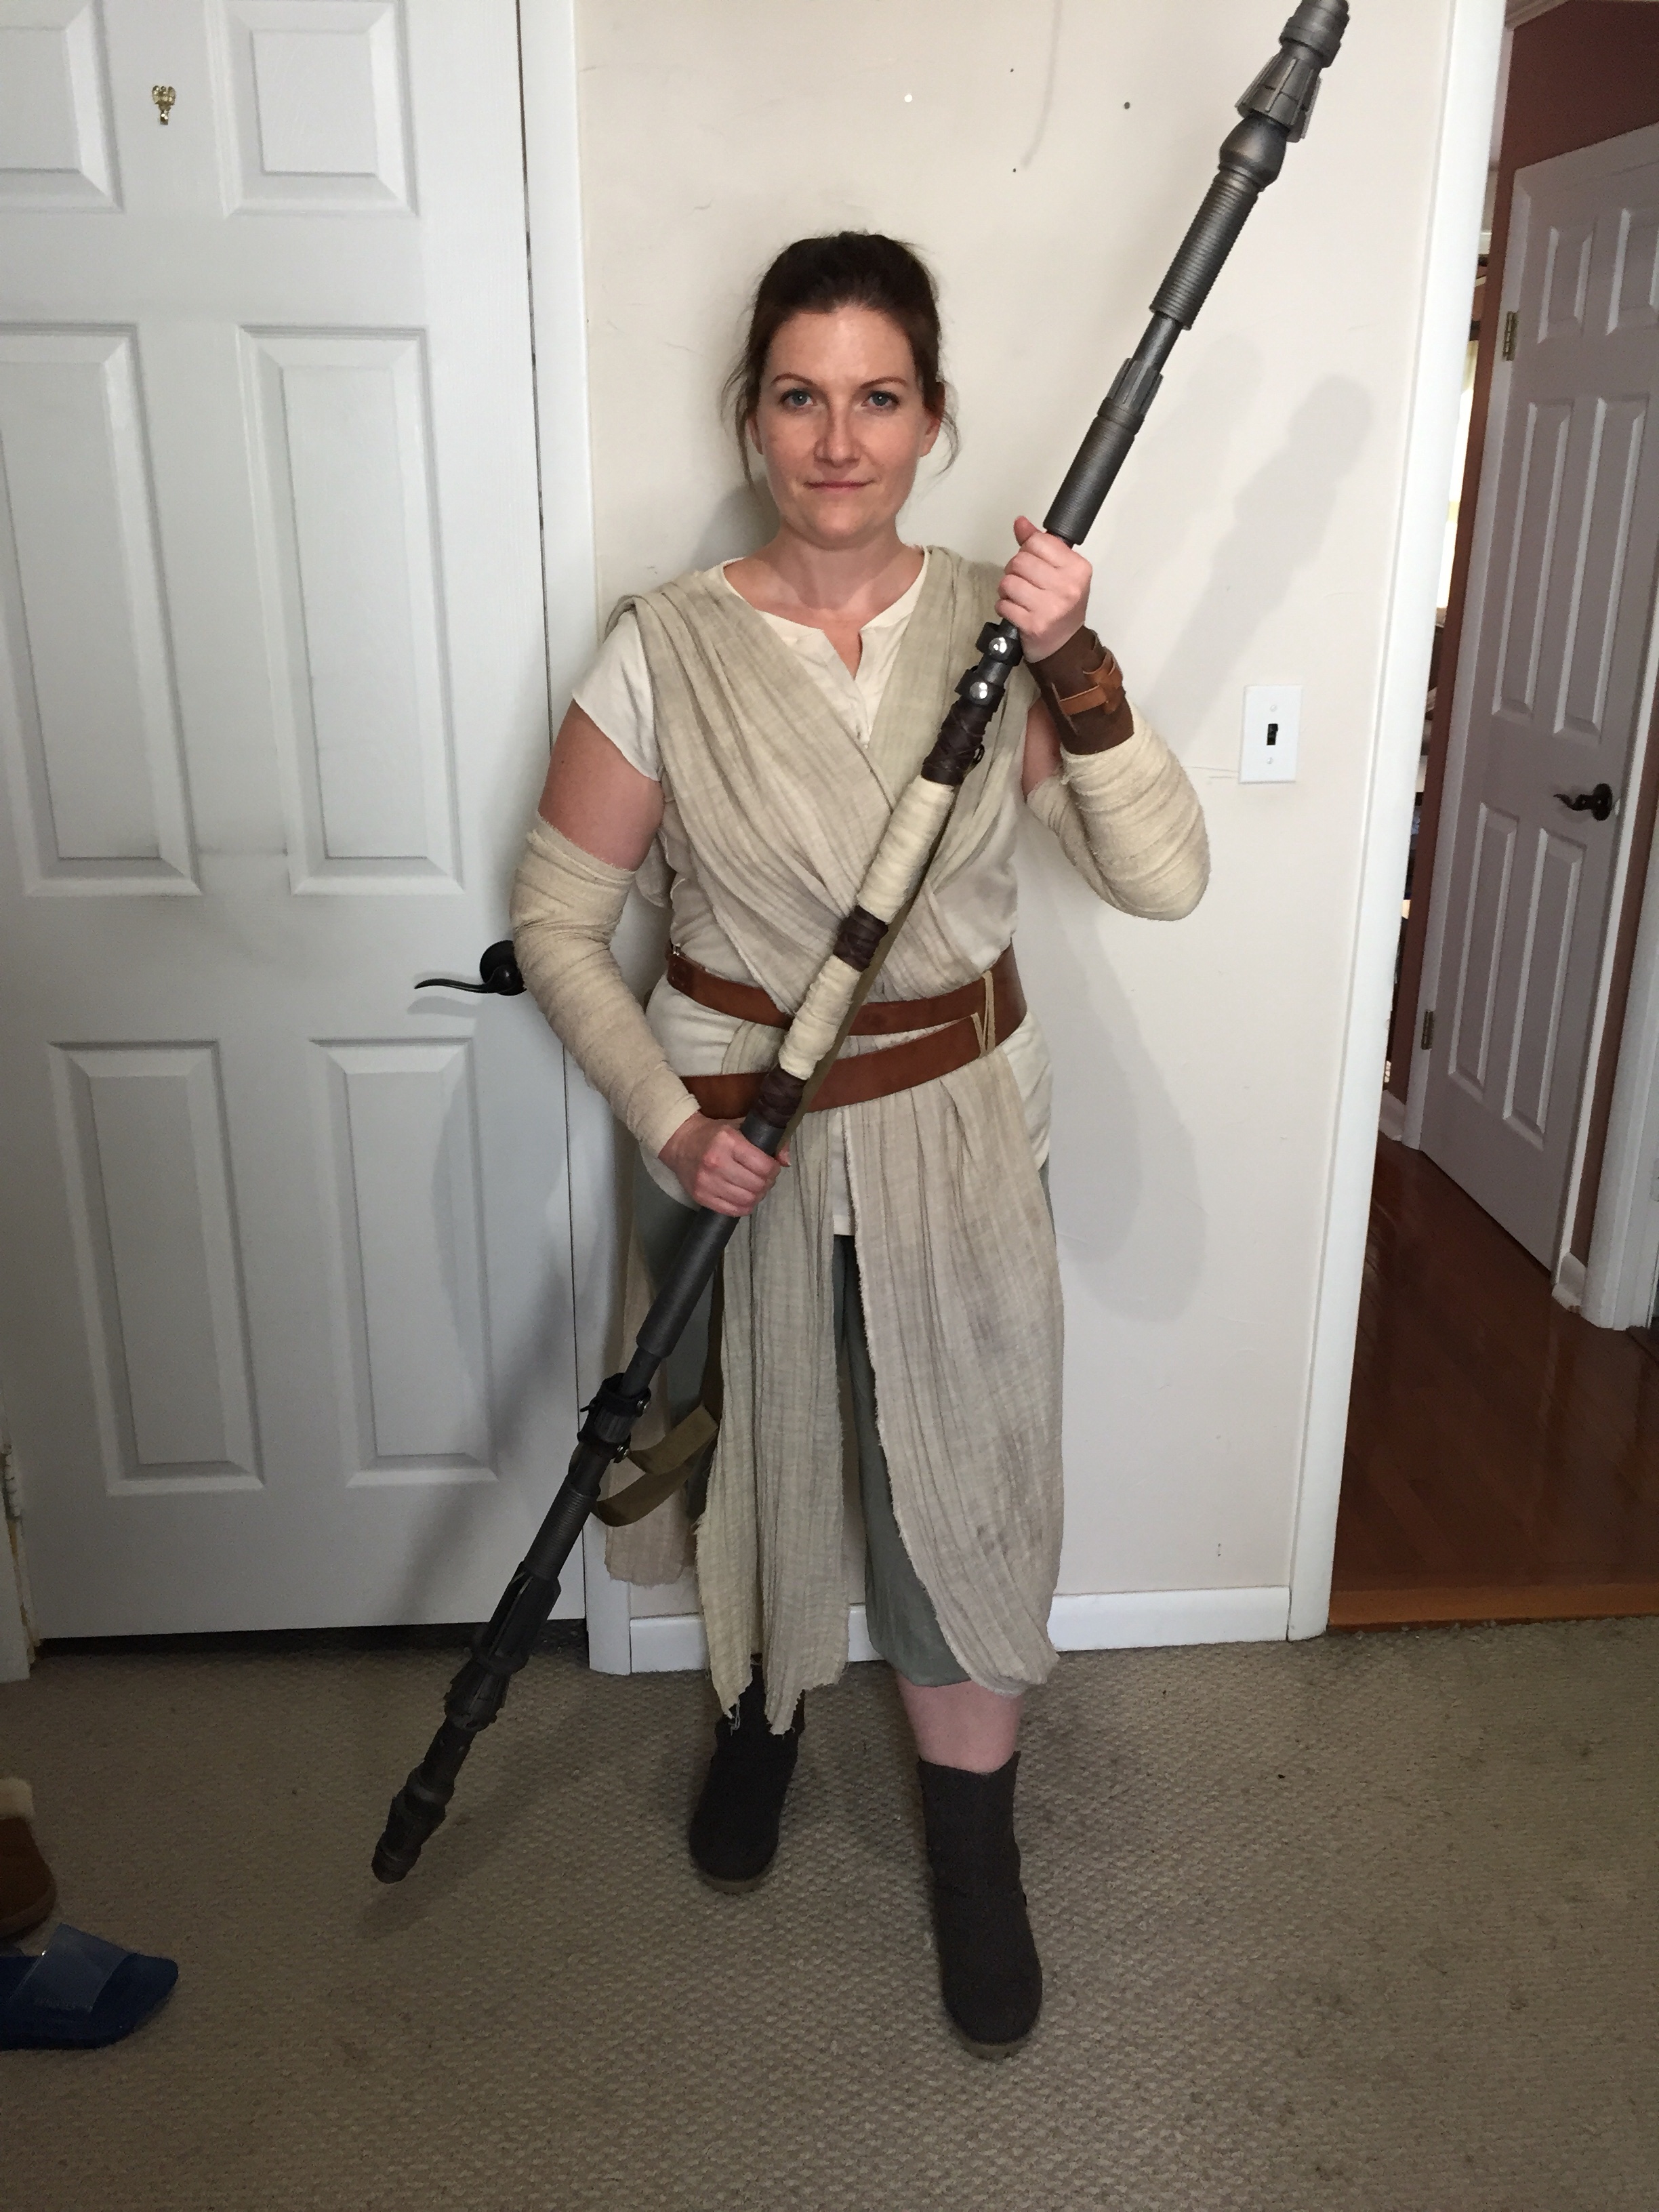
Making a Scavenger: Rey’s Base Outfit

Originally I had considered mashing all of the soft pieces I created for Rey into one long post, but after I hit 1,000 words halfway through the pants alone, I decided to break them up into shorter posts so you’re not hit with a wall of words.

welcome.gif

You’re welcome.

Before we start, let me make two notes:

ONE: There is a saying among Rey cosplayers that our girl’s outfit consists of “fifty shades of greige”, and let me tell you: this is one hundred percent true. Depending on what source material you’re looking at (movie stills, photos of the costume from traveling displays, the movie itself), the material changes colors, making it damn near impossible to perfectly match the original.

Having said that, the goal when dyeing your pieces should not be to match the screen-worn outfit, but for all of your pieces to match each other. That is, your pants need to be the darkest of the pieces, with the shirt being the lightest along with the arm wraps, and the tabards (the flowy fabric that drapes from her shoulders) is somewhere in the middle.

Now, if you’re just going for a con Rey and have no desire to go for Rebel Legion approval, by all means, GO NUTS. Get down with your greige self! But if you’re going for 100% screen accuracy, prepare for a lot of tears, a lot of wasted dyeing, and desperation on a scale you previously only thought existed in Jane Austen novels.

And TWO: f you’re building a Rey – Rebel Legion or not! – I HIGHLY SUGGEST you join the Rey Cosplay Community on Facebook. If I hadn’t joined the group, I never would have known where to even begin. This group has the most detailed files and lists and links, seriously. I have yet to find another costuming-focused group on FB with as many well organized resources. Go join. I’ll wait.

Good? OK. Let’s get started.

Shirt

IMG_1285

To make Rey’s shirt, I started out with a recommendation from the Facebook group – there were 3 or 4 options, but at the time this one was the only one available, so I went for it. In hindsight, I could have easily gone a size or two smaller on the shirt (and wouldn’t have had to take it in on the sides like I ended up doing), but maybe when this shirt falls apart I’ll upgrade.

Either way, I started off with white and just dipped the shirt in a big pot of tea that I had brewed to add some brown to my tabards (more on those in another post). After the tabards were done, I tossed this pure white shirt in there for a few seconds and voila: perfect color.

But the shape was off because I bought it big, so I took in the sides, sliced the sleeves shorter and stitched the collar up ever so slightly so it resembled our girl’s busted up tunic even more:

IMG_1283

To finish it, I weathered it with brown and black eyeshadow and a big-ass makeup brush.  It was surprisingly easy to get it looking kind of grimy within a few minutes!

Pants

Many girls in the Rey Facebook group had luck with these pants from Amazon. Because they were so cheap and wouldn’t require hemming, I got them in white first. I say first because I had to eventually re-dye them, but we’ll get there.

On dyeing day one, I had next to no idea what the hell I was doing. So when I first dipped my white pants into a bath of Sandstone and Frost Grey Rit dyes (according to the Rey Facebook group this was the concoction that worked for everyone), I took them out and screamed: as you can see on the left, they were basically blue/green and unusable.

Now, this was also before I DRIED the pants. For all I know, they would have been just fine if I’d waited for them to dry. But I panicked and immediately tossed them in a pot of dye remover… which gave them a permanent green tinge.

I’ll pause here to note that the dyes I used were specifically for synthetic fabric, which is what these pants are made of. But the ratio of colors was never really listed anywhere – it’s always “just eyeball it”, so I did. Depending on what fabric you use, you might be able to use regular Rit dye and get better results than me! The point is start slow and do not get discouraged.

At the time, I thought the pants (after drying) looked a tiny bit green, but because the colors all had to be relative to each other, I took a break and focused on finishing the tabards before I went back to the dye pot.

So stay tuned for my next post where I go into detail on how to make Rey’s tabards and arm wraps!

Ready Player One

Although most of you have probably figured it out by now: Since the NYC Marathon, I’ve been pretty disillusioned with sharing my running journey online.

giphy

*sarcasm* shocking, right?

I guess it comes down to the fact that I started to get tired of playing the game, especially around Instagram.

Looking back, the amount of time I spent on that app is embarrassing. I wracked my brain coming up with a creative Instagram-worthy photo angle for every run. I wasted a half hour after every run selecting, editing, and captioning a picture. I worried about what I wore because I’d already worn black for my past three runs and needed to inject color into my IG feed. I found myself sitting at dinner in a restaurant with my husband, with my nose buried in my phone while I picked out hashtags. I was injured, but I still went on painful runs – sometimes just to “keep the feed fresh”.

And even though I did those things, I still lost followers.

relax

Then I lost my job and fell into a depression. For those of you who haven’t had the good luck (again with the sarcasm) to experience depression, my idol Carrie Fisher summed up what it feels like with heartbreaking clarity while in the middle of her own manic episode in Bright Lights:

“You know what would be so cool? To get to the end of my personality and just, like, lay in the sun. I’m sick of myself.”

At my lowest point, I was so sick of my self that Instagram seemed like a cruel joke. I hardly felt inspirational. I couldn’t even look at myself in the mirror, let alone take yet another picture of myself and share it with 16,000 people – the majority of whom I have never and will never meet.

I lost the courage to even try.

Because I dropped out of the game (and yes, it is most certainly 100% a game that Instagram will always win because they control what accounts get exposure), I lost nearly 1,000 followers since November. And I’m losing more every day. I can’t figure out the algorithm no matter how much or little I post or what hashtags I use.

But a funny thing happened since I came out the other side of that whole depression thing: I finally want to run more.

IMG_4026

After nearly 10 months of being disillusioned with running in general and not even thinking about racing, the other day I got an email from the Run Newport folks about running the Newport Half next month and actually got excited.

IMG_1007

The thought of a half marathon gave me butterflies.

I got the jimmy legs thinking about the thrill of the starting line.

I started looking at training plans.

While I’m in absolutely no shape to run the Newport Half (because it’s in less than 6 weeks and I haven’t run more than 4 miles in about 10 months), I’m probably not going to be running it (but I WILL have an entry to give away, woohoo, stay tuned!). But I WILL start slow, starting now.

It’s going to take courage to try again, but I’m ready.

I’ve committed to run 2-3x during the week after work and slowly build up my long run mileage on weekends. The plan is to get to 6 or 7 PAIN FREE miles for a few weekends in a row before I even sign up for something.

It’s not a plan, per se, but it’s more than I’ve done in 10 months, so there you have it.

IMG_7750

Once it became more of a plan in my mind over the past few days, I found myself excited to blog about it – and even more excited to share my story on Instagram once more.

I don’t know what race I’ll be doing or even when I’ll run it. Throughout training, I won’t spend a half hour picking out the perfect filters or an extra half mile trying to get the right running selfie after every run. But I WILL be sharing my journey again, and I’m excited to have you along for the ride if you’d like to join me. ❤

Jedi in Training: Building Resistance Rey

Before I even had my Rebel Legion approved Jakku Rey finished, I had already set my sights on my next costume:

IMG_2981

Resistance Rey

When I first saw this costume at the end of The Force Awakens, I immediately gasped and thought: THAT is a costume I want to wear. But having been a member of the Rey Cosplay Community on Facebook for a few months, I’d seen the struggles these ladies went through while trying to get their vests and gauntlets just right.

IMG_2983

But thanks to Jakku Rey, I had a LOT of the parts for this costume already: the staff, belt, boots, leg holster and even the blaster (which was totally a “tipsy on Etsy” purchase that I DO NOT REGRET). I needed, essentially, just a few pieces:

  • vest & gauntlets
  • gray gauze wraps (for under the gauntlets)
  • wrap shirt
  • pants

Considering I’d done my share of research and – let’s be real, creeping – on the folks who had built this costume before me, I was fairly certain I’d be able to commission most of it and give the pants a try on my own.

I didn’t dwell on it too often though; my Jakku Rey build took up most of my time, and my initial rejection after my pants were too green (more on that later) left a sour taste in my mouth for a minute. But instead of being a Petty Betty, I continued to watch and admire all those beautifully crafted vests and gauntlets from talented seamstresses in our group and thought “Maybe if I hit the lottery.”

Well, turns out I didn’t need the lottery – just a surprise bonus at work and a grateful Scavenger Sister who discounted her work to nearly half the usual price!

IMG_3781

Wendy of Chic and Geeks is a real life ANGEL, you guys.

Seriously. Just look at that detail:

img_5175.jpg

Not only did she NOT reach through the phone and slap me silly when I went bananas trying to figure out my measurements, but she created the vest, gauntlets, AND bag for me at an incredible price – AND she even threw in the gray arm wraps for me at the last minute!

IMG_3775

They are so far beyond anything I could have created myself – seriously, my plan was to just wing it with gray gauze fabric and hope for the best. Instead, she wrapped, stitched, and color matched these babies to the whole outfit so I don’t have to waste another month of work on that “tiny” detail.

IMG_3782

And don’t even get me started on the bag, and the gauntlets. Seriously. The attention to detail she has is second to none. I drool just looking at these things. Knowing that they’re here waiting for me just gives me the happies.

So now that I’ve got roughly 75% of the whole costume done, I’ve just got the shirt and the pants to do! The shirt I’m looking at commissions for at the moment, and the pants… well… let’s just say I have approvable pants and I’ve started on them. More on those in another post if and when I’m successful!

Basically I went from dreaming about wearing Resistance Rey in May to possibly having a Rebel Legion approved build by the time I headed to New York Comic Con that October!

How about you: what are you currently working on? Share in the comments! 

Making a Scavenger: Rey’s Staff

The part of my costume that I’m most proud of, by far, is Rey’s staff. This is easily the first thing that every single person, old or young, male or female, notices when I’m trooping. I absolutely delight in the looks of awe when people ask to see it up close and hold it.

fullsizeoutput_100a

When I first planned my costume, I had considered not even building a staff; it isn’t technically required by the Rebel Legion for costume approval, after all. But after seeing photos of other badass Reys wielding their staffs at troops, and, quite frankly, realizing that I wouldn’t have anything to do with my hands, I decided to take the leap. And I am so glad I did.

IMG_5163.JPG

Clocking in at about 6’4”, my staff is made of a 1” wooden dowel core, 3D printed pieces, spray paint, leather and fabric. It took me hours of painting and gluing and sawing spread across about four weeks. It’s solid, heavy, and thanks to the weathering technique I discovered when I sponged bronze paint onto the finished edges, looks super realistic.

IMG_4236

To start, I knew from the Rey Cosplay Community group on Facebook that my options for the staff base were either a 1″ wooden dowel or a PVC pipe. Some that had gone that route said the PVC was bendy, so I opted for wood. After learning they don’t sell 1″ wooden dowels over 6 feet tall (and also conceding that I should probably be able to break the thing into two pieces for easy travel), I settled on two 4′ tall dowels that I shortened and connected with a little ingenuity and some help from my papa.

IMG_1244.jpg

I’d seen many of my Scavenger Sisters succeed with 3D printed pieces from a variety of sources, and ultimately ordered my pieces from the father of one of the group members. Bonus: he lives near the talented woman who made all of my leather pieces, and she was able to ship everything together to save on costs! Sweet!

IMG_1217

I’d heard horror stories of other Reys having to sand the hell out of their printed pieces and/or their dowels in order to get them to fit, but by some miracle, I did not. They slid right on seamlessly. And after some checking and re-checking of the handy-dandy color coded guide (in the photo above) and creating a cat-safe space for my pieces to dry in overnight, I had Gorilla Glued all the parts on and moved on to connecting them.

In Home Depot, I wandered the plumbing aisle in search of a metal connector set that I could attach to either end of the break in the middle. When an employee saw my furrowed brow and asked if he could help, I told him what I was doing. To his credit, he excitedly explained that I should probably go for plastic connectors because they’d be easier to anchor into the dowel by Dremeling screws through them and into the wood. BRILLIANT!

bgnh8819.jpg

To start the process, I Gorilla Glued the connectors to the edges – they were 1″ connectors, but physics being what they are, of course they were larger than the dowel, and needed some stuffing and propping to keep from wobbling. The glue was really just extra insurance, after all, since I planned on using the Home Depot employee’s idea and also screwing them in. You can see the fabric stuffing sticking out in the photo above.

Once the glue had cured for a full day, I asked my dad if he could show me how to use his Dremel tool, and he obliged – in the half hour before we took him out for his birthday dinner! It was fun learning some new skills and working together with my dad to create this piece of my costume. He was so sweet, asking me if this was for “coz??” Turns out he’d asked his friends if they’d heard of this thing and misunderstood when someone explained to him what “cosplay” is. *squee*

IMG_1277

The result still looked kind of janky, but later that week the weather finally improved and I was able to move onto the next step: painting!

This is another place where I learned from the Reys that had come before me. I was totally unaware of things like textured spray paint until I joined the group, but after one helpful Rey took a snapshot of all the paints she’d used in the layers of her build, I literally went to the spray paint aisle with that picture on my phone and grabbed all three cans.

IMG_1342

I started with a black, then added a textured silver/gray, and lastly added another kind of textured paint with a dull sheen to it that ended up looking quite metallic.

To weather it, I experimented with some techniques before sponging bronze acrylic paint my father had lying around onto just the edges of the entire staff in uneven strokes. The result even had my mom asking me, “Wasn’t that wood a few hours ago? How is it rusted metal now??”

IMG_1329

I was over the moon excited to have it looking so great. The only thing I had left to do was add the finishing touches of fabric, leather and the strap.

IMG_5172.JPG

The fabric was just some were just some leftover gauze scraps I had lying around from my wrap dress and cutting the sleeves of my shirt. I used some movie stills as reference photos to find their placement within the 3D printed pieces and figured out a process of hot glueing the base, then wrapping, glueing, wrapping, and so on.

Note: The top fabric area conveniently hides the connector!

The leather was an easy find at AC Moore: two thicknesses of leather cording that I used the same process as the fabric: anchor, glue, wrap, repeat. Once everything was set, I busted out the eyeshadow and “weathered” the whole shebang by sloppily brushing brown and black eyeshadow all over the fabric.

IMG_5173.JPG

Finally, the strap was an Amazon purchase recommended to me – yet again – from other Reys who had been RL approved. The only thing I had to was paint the metal details on it with some black acrylic paint I had from old crafting projects, and purchased a pair of the handmade leather strap connectors from a fellow Scavenger Sister and *voila*!

IMG_3651.JPGFinished staff!

At my first troop, I walked into the changing area and found a handful of guys suiting up in custom-built Stormtrooper kits with dozens of pieces and insanely detailed craftsmanship – yet they stopped in mid-sentence when they saw my staff! These guys put weeks or even months into their armor, and they were oohing and aahing over my build? Talk about an ego boost!

IMG_4261.JPG

Even Leia had to get in on the quarterstaff action!

After that, every person who showed up to troop with me that day had to get a good look at it. Every shy child who was too scared for a photo turned into a beaming Jedi-in-training when I’d whisper “Would you like to hold my staff?” and they wrapped a little hand around it while I held it safely above without them seeing. At a slower troop last weekend, I got into more conversations with passing adults about how I made the staff than I took photos with kids!

Ultimately though, I wouldn’t have it any other way. I am probably the least adept at tools, building things, and generally being handy. So this was a huge project for me and one that I’m super proud of. I’d wear the damn thing to work if I could. If I can build it, you TOTALLY can! Let me know how you fare if and when you take this project on, I’d love to see your progress!

Why Rey of “Sunshine”?

How did I get the name for this new section of my blog? Sure, Rey is a pretty obvious choice, and the pun on being a “ray of sunshine” always makes me giggle. But the name Sunshine has a double meaning for me:

Ever since I was a baby, my mom would sing me “You Are My Sunshine”, and it’s always reminded me of her. So much so, in fact, that it inspired my first tattoo:

Now, while my mom was around when the original trilogy came out, she never became a fan. But when The Last Jedi came out, she asked if we could go see the movie together, and I melted from happiness. I tried explaining that she might not know who some of the people were and it could get confusing, but she didn’t mind – she just wanted to go see the movie that made me “so happy”. Could you just squeal??

So after giving her a crash course in the new trilogy, we watched TLJ and loved every second of it. I caught her laughing and smiling along. The crowning moment of my life, though, came when Luke is training Rey on the ledge and she describes what she sees. When they briefly show a mama porg shielding her little babies, my mom went, “AWWWW!” right there in the theater. My mama porg ❤

After the movie, we went out to IHOP and I mentioned to her that my goal for 2018 was to join the Rebel Legion so I could go on troops at children’s hospitals and other charity events. She was thrilled for me, and even asked me how the costume was coming in the next few months.

When she and my father finally came out to see me at a troop, and it all came full circle. As we walked through the convention floor, a little girl ran up to me for a photo. My parents stepped away and looked on as I told the little one to put her hand on my staff and we posed for the picture. Afterwards, my mom mentioned how cool it was that these kids get to see their favorite characters, and how happy she was that I got to do that for them.

That’s when it hit me: every time I strap on those belts and pull my hair into those buns, I can be a “Rey” of Sunshine for these kids. And that’s how I got the name for this little corner of the internet!

May the Fourth Be With You

Since hurtling headfirst into the Star Wars fandom back in 2015, I’ve celebrated May the Fourth in increasingly ridiculous ways each year. IMG_1593 My first year, May 4th also coincided with a launch party I had a hand in planning at my job, so I coopted a small section of the party and created the Mos Eisley Cantina, complete with my little Sphere BB-8 and a Photo Booth with masks: The following year, with no parties in sight, I celebrated May the Fourth by surprising my coworkers with a pop-up Tosche Snack Station, complete with Princess Leia buns and Sarlacc Pit Dip.

That night, I attended a Paint & Sip party with my friend Jenny, where we got tipsy, created lightsaber paintings under the guidance of a guy dressed like Han Solo, and generally had too much fun.

In 2018, I was SUPER stoked: I had just started a new job at an incredible place, and wanted to treat all of my new coworkers with a full on feast… and they LOVED it.

IMG_1572 Before I could even get it all set up, people were calling friends from other departments to come and see the “party” I had created. IMG_1577 I took a risk in showing my “true” self to these folks and they ate it up – literally and figuratively. Really, there was like no food left by 10:30am. IMG_1586.jpg 
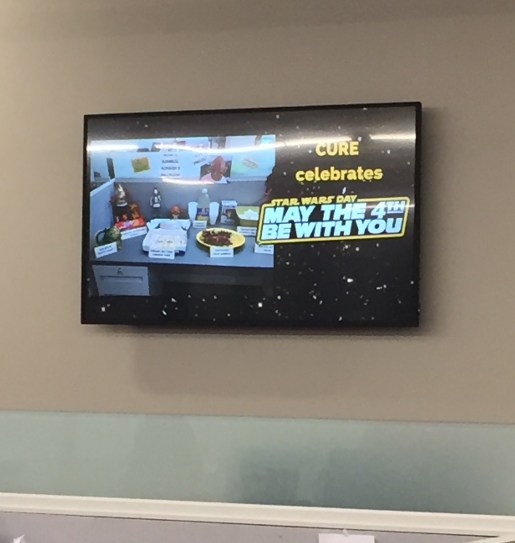
In fact, I made such an impression that HR saw fit to include a recap of the party on the office-wide TV screens for more than a week after the fact: img_1738.jpg After the office party, I had my heart set on another Paint & Sip event after having such a great experience the year before. Unfortunately, the only one near by was about an hour away, and I don’t know about you but paying $40 for a Paint & Sip night and only painting and not sipping because I have to drive is kind of lame. IMG_1647.jpg But the picture was sooooo pretty!!! 
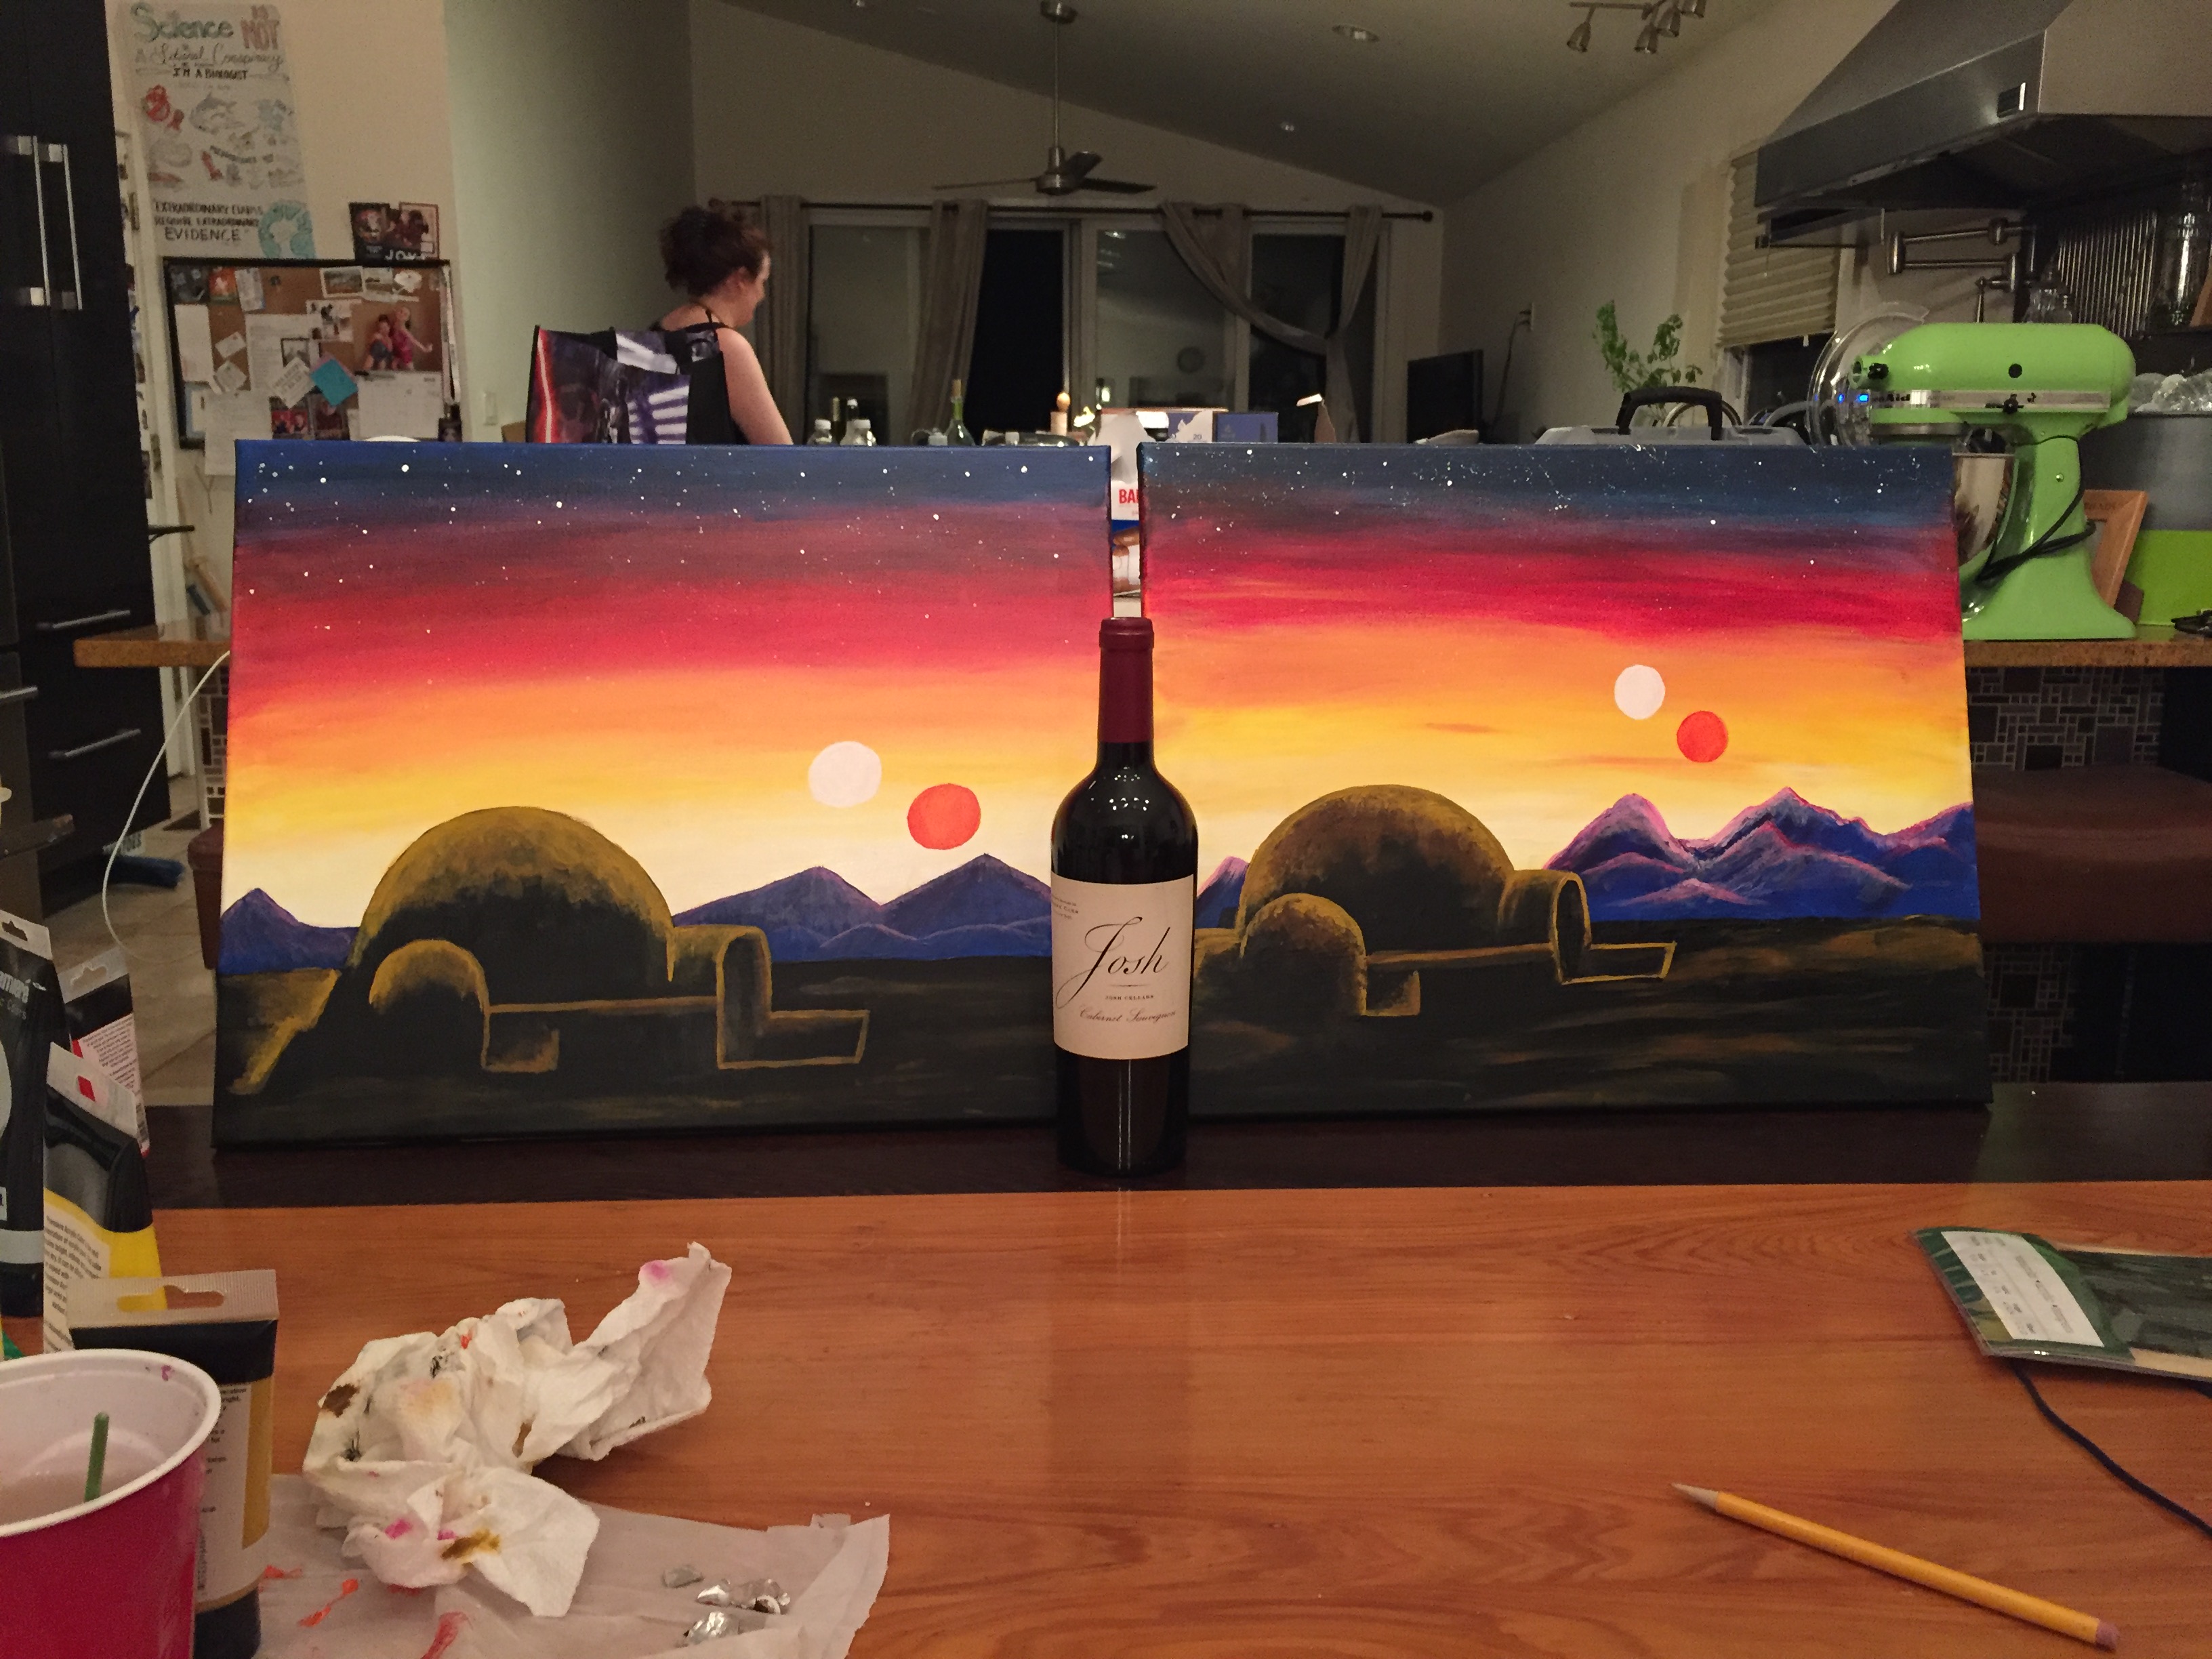
Luckily, I have VERY talented friends, and after I lamented not getting to paint this gorgeous thing, my friend (who happens to live across the street from me) invited me over for our own local Paint & Sip and we did a pretty stinking good job if I do say so myself:
Do you celebrate May the Fourth? Do you have any party planning tips? Share in the comments!

Dream Cosplays

While I haven’t had much experience as a cosplayer, one thing I DO have is Star Wars experience. A few solid years of it, actually. And if years in this fandom has taught me anything, it’s that it’s not the skill that’s important – it’s the desire to make something happen.

IMG_4712

With that in mind, I’m a big believer of putting those crazy lofty goals out there in the universe, if not just to make them real. So today I’m going to talk about my dream cosplays – because even though they seem like impossible dreams now, who the hell knows where I’ll be in a few years’ time?

Enfys Nest

235159780715706cee4c56ab4619f103
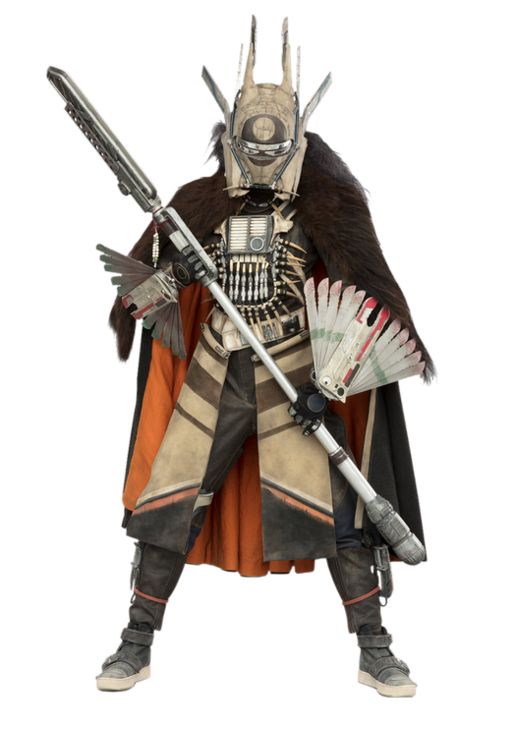
Spoiler Alert if you haven’t seen Solo: A Star Wars Movie (though why you’d be reading a Star Wars blog if you haven’t seen a Star Wars movie that’s been out for more than 2 months is beyond me), but Enfys Nest is definitely one of my top 5 dream cosplays. I went into the movie liking the look of the character, but when that helmet came off, I FELL IN LOVE. Immediately I wanted it all: the cape, the fur, the helmet, the staff…

enfys-nest-05272018-970x545

And when I learned what the helmet actually said??? I want to cosplay as Enfys Nest in a bad way. Even if I could make or own the helmet, I think I’d want to be buried in it. It’s that badass.

Stormtrooper

71zKw0RspBL._SY679_.jpg

Random, and kind of out of character, I know – but something about the iconic look of this suit just screams awesome to me. When I see a TK at an event, I immediately smile. Yes, I know they should have the opposite effect because they’re the bad guys, but it’s just… they’re classic, instantly recognizable, and again, just like Enfys Nest, BADASS.

Queen Amidala’s Red Invasion Gown

img_4768

This is it, guys. The gown that got me into Star Wars. The dress that launched my cosplay fantasies, if you will.

queen-amidala-throne-room-1536x864-214349176501.png

This one is by far my ultimate. If I could only ever create one more costume for the rest of my life, it would have to be this one.

009_221-004

I’ve gone as far as researching the different fabrics and materials used by other costume builders to create their own versions, and have even sourced materials nearby, but I haven’t considered this a reality. Maybe one day 😉

What about you? What are your dream cosplays? If you could create or own any costume, what would it be, Star Wars or not?

I Love Trailer Reaction Videos

When The Force Awakens opened, I discovered the wonderful world of Trailer Reaction Videos and fell in love. If you haven’t seen these, it goes like this: people apparently record themselves watching something for the very first time and share their reactions with the community, much to the delight of all involved. I found the emotions these people shared to be so raw and so real, and I loved it. Seriously, just try NOT to cry when a whole slew of people SCREAM WITH JOY when Han Solo shows up in this one (it happens around 1:23 and I cry. every. time.):

So back in April of 2017 when The Last Jedi teaser trailer was released at Star Wars Celebration, I recorded myself watching it for kicks and never really did much with it.

Although I did learn something about myself: when I’m truly surprised, I make the exact same faces as this guy.

giphy.gif

Don’t believe me? See for yourself (pressed for time? scrub to 1:40 for my facial gymnastics):

You’re welcome.

So anyway, in keeping with my tradition of recording reaction videos, I hit record when the FULL Last Jedi trailer premiered, and this is what we get:

Note: I did edit the end of the video a bit tight; apparently my emotions were running SO high that I turned and spewed a whole litany of “I told you so”-type expletives at my husband that are definitely NSFW, so there you go.

What do you think about trailer reaction videos? Have you ever recorded one? Even if it’s not Star Wars related, please show me, I love squealing over things excitedly with other fans!

The Joy Awakens

How did I get into Star Wars and the Rebel Legion? Pour yourself a mug of thala siren milk and pull up a chair, it’s story time.

My infatuation with Star Wars has taken a winding road through my life. Full disclosure: I’m not one of those people who was raised with this franchise in my blood. In fact, I distinctly remember my grandmother trying to get me into the original trilogy, which I turned up my nose at. Labyrinth was LIFE for me from ages 5 through 12. These space movies were boring. They didn’t have any singing or dancing (or David Bowie), so I didn’t have any interest.

What I did have was crippling anxiety and depression, even at a young age. My first panic attacks happened between grade school and middle school, and I soon learned (with help from a great therapist and the support of my parents) that change was what set that anxiety off. Fast forward to the end of middle school, when high school loomed on the horizon, and my anxiety started to creep back into my life like a storm cloud.

And magically, The Phantom Menace arrived on the scene.

The hype for this film was at its peak right when I needed a distraction. I still remember seeing Natalie Portman in that incredible red gown in the trailers and thinking, Oh. Girls can like this?

So I liked it. A LOT. For a few years. I jumped right into the fandom and watched the movies over and over again, read the comics, hung the posters on my wall… and then I got used to high school. I fell into a rhythm and found other outlets. By the time Revenge of the Sith had come out, I had more or less lost interest once again. Even though I’m ashamed of this, I’ll admit: I became “too cool” for Star Wars.

Fast forward once more to December of 2015. I was 32, married to the best guy ever, had a stable job and a successful blog, and everything going for me. But I had fallen into a depression unlike any other I’d experienced in my 32 years. Everything hurt. At my worst, my husband had to drive me to the park and physically pull me from the car to walk by the water, just to get me out of the house.

I’d seen trailers for The Force Awakens and knew that I wanted to see it just for a distraction and an excuse to eat some popcorn. But when we finally sat down in the theater the day before New Year’s Eve, I had no idea that the movie I was about to see would quite literally turn my life around.

I watched it three times in the movies and quickly fell back into the fandom – which was even easier this time thanks to social media and the incredible team at Disney that turned Star Wars from just a bunch of movies and comic books and TV shows into a true way of life. My friends who had loved Star Wars from the start all laughed at me as I tumbled down the rabbit hole and re-watched every movie over and over, connecting the dots and learning the names of all these characters.

It was like I had found a family I never knew I belonged to.

When my closest friend Debie held a Star-Wars-themed 10th wedding anniversary/vow renewal costume party in May 2016, I knew I had to dress up as Rey.

Rey embodied all the qualities I wish I had: bravery, strength, focus, determination… plus it didn’t hurt that she got to use a lightsaber! So I started scavenging costume pieces from anywhere I could find: Kmart curtains I dyed in a pot of tea and hemmed with hot glue became my tabards; Uggs served as good enough desert dweller boots; the staff was just a child’s toy I bought from Amazon and duct taped together when it arrived broken.

But when I put that costume on and pulled my hair into those buns, I physically felt different. Stronger, more capable.

However, dressing as Rey in the office is frowned upon, and people tend to stare when you run errands in cosplay. So I packed my costume away and stuck with enjoying the idea of dressing up in a smaller way at events that featured Star Wars characters, like Star Wars Nights at local baseball games and charity events.

Finally, at the New Jersey Devils’ Star Wars Night in December 2017, I gathered the courage I needed to make conversation with one of the characters and asked all the questions. How do you do this? You make a costume to specific guidelines and submit for approval and sign up online to “troop” with other characters at things like children’s hospitals and sporting events. Can I do this? Absolutely!

It was like a lightbulb had gone off: I could dress up as Rey AND do good? I became obsessed.

Slowly but surely, I started gathering all the info I could from Facebook costuming groups and online forums. Piece by piece I built my costume, with hours of blood, sweat and tears…. OH so many tears. I obsessed over the minute differences between sandstone, beige, eggshell and cream. I went to hardware stores and learned how to use a Dremel tool. I stabbed myself with sewing needs and burnt my fingers on hot glue.

Finally, after being approved in late June of 2018, I went on my first troop at a Lego convention in early July. Within the first hour, a child came running at me with open arms and screamed “REY!”… and I didn’t stop smiling for the next seven hours. My cheeks hurt the next day.

I had found my thing. In all the things I’d done before – running, writing, etc – I mainly took pleasure in them for pretty selfish reasons. Sure, running helped me fund-raise for charitable organizations, and writing allowed me to help other people by sharing my story about anxiety and depression, but cosplay has given me instant gratification – I see the smiles on these kids’ faces and know I’m doing a good thing.

So here I am, starting this blog. I’ll share the ups and downs of creating these costumes, talk about my favorite parts of the fandom, and most importantly, talk with YOU about what you’re working on! The only reason I’ve come this far is by connecting with other folks who do this too, and now I want to Rey it Forward (ah? See what I did there??) and share the knowledge and gain even more of my own!

So thanks for stopping by – and reading this ridiculously long post – and be sure to give me a follow on my Star Wars themed Instagram to stay in the loop!

Mile 26

Real Talk: The TCS New York City Marathon left me turned off about running. With having to put our cat to sleep the day after the race and dealing with injuries for months post-race, I never felt that post-marathon high.

I deleted almost all of the pictures from that day off my phone. But for some reason, I couldn’t delete this one: the Mile 26 marker.

I still remember how I felt when I snapped this picture. Every inch of my body hurt. It was dark and rainy, spectators had all gone home. When I saw Mile 26 I thought “Who cares. There’s no triumphant final push left in me, why should I take a picture?”

But I did, and every time I clean my camera roll, I still won’t delete it. It took me 7 months, but now I know why: because it was the lowest point I’d been at in months… BUT I KEPT GOING.

I got that medal. I pushed through a mental and physical hell I created for myself over 25+ miles through the five boroughs of NYC and I survived, just like I’ve survived every other “lowest” point in my life. It’s a reminder that there’s always something to look forward to, even if I have to go through just .2 more miles of hell to get to it.

When you get to your Mile 26, just keep going. I know it hurts. But it’ll be worth it.